Zieglers

Just little about C#, .NET, SQL Server, SharePoint and SAP

Posts Tagged ‘Alerts’

SPNotifications published on CodePlex!

Posted by zieglers on August 29, 2011

Finally today, I was able to publish my latest CodePlex project – SPNotifications.

SPNotifications provides floating warning/alert type of notification boxes which can be used to notify your SharePoint users.

Using SPNotifications, you can notify your users by show notification messages such as weather warnings, corporate updates, events …etc.
Notifications can be displayed on any page of your selection, for example, home page of your intranet, or landing pages for each department.

SPNotifications uses jQuery – jGrowl plugin for displaying notifications. Your notifications are stored in a custom list called ‘Notifications’.
Power users or admins can also use a custom application page to populate new notification messages.

You can find all the details on SPNotifications site on CodePlex.

Please give it a try and let me know what you think..

zieglers

Posted in IT Stuff, SharePoint, SharePoint 2010 | Tagged: , , , , , , , , , | Leave a Comment »

jGrowl Notifications for SharePoint 2010 – Part 2

Posted by zieglers on August 22, 2011

This article is the second part of “jGrowl Notifications for SharePoint 2010” series. If you haven’t read the first part of the series, you can read it here.

In the first article, we implemented the infrastructure for “jGrowl Notifications for SharePoint 2010”. From now on, i’ll refer to it as SPNotifications. First version was pretty raw in the sense that it was still using soap envelopes which are really hard to construct and not that practical to use. Also first version was just a teaser and it was missing some business logic too.

What’s in this article?

In this article i’ll try to show how to replace AJAX calls using soap envelopes with SPServices calls.

SPServices is a jQuery library which abstracts SharePoint’s Web Services and makes them easier to use. It also includes functions which use the various Web Service operations to provide more useful (and cool) capabilities. It works entirely client side and requires no server install.”

Once we have a cleaner syntax, we’ll add a simple logic where notifications will be read from a custom list called -you guessed it- Notifications. Also upon closing a notification, we’ll implement a close callback logic which will mark notification as read. That should do it as for the scope of this second article. Further improvements will be explained in future articles of the series.

Implementation

First of all, let’s try to list implementation tasks:

  1. Include SPServices default syntax.
  2. Generate CAML query for AJAX call.
  3. Implement completeFunc details.
  4. Implement MarkAsRead function.
  5. Test it!!!

1. Include SPServices

Inside document.ready include this SPServices call as shown below.

// ***************************************

$().SPServices({
operation: “GetListItems“,
async: false,
listName: “Notifications“,
CAMLQuery: query,
CAMLViewFields: fields,
completefunc: function (xData, status){

} // end – completefunc

}); // end – SPServices

// ***************************************

Operation is GetListItems – since we want to read items from Notifications list.

listName is Notifications – a custom list with additional fields Description, Assigned To and Status (Read, Unread).

Choice values for Status field are ‘Read’ and ‘Unread’. Also, at this point you can add some sample items in Notifications list.

2. Generate CAML Query

Now, we have the skeleton for SPServices call, we can go ahead and specify our CAML query. We want to show only notifications where:

  • Assigned To values is “current user”
  • Status is different from ‘Read’

query‘ variable will store CAML query to be executed. ‘fields‘ variable will have fields that we want to display in the notification.

// ***************************************

var query = “<Query><Where><And><Eq><FieldRef Name=’AssignedTo’ /><Value Type=’Integer’><UserID Type=’Integer’ /></Value></Eq><Neq><FieldRef Name=’Status’ /> <Value Type=’Choice’>Read</Value> </Neq> </And> </Where> </Query>”;
var fields = “<ViewFields><FieldRef Name=’Title’ /><FieldRef Name=’Description’ /></ViewFields>”;

// ***************************************

You can include these variables at the top of the script as shown below.

3. Implement completefunc

This is the part that now we have our results returned and ready to be formatted before displayed. As mentioned in first article too, jGrowl will be used for presentation of notification messages. Here we will be setting some jGrowl options.

Position:

Life:

Sticky:

Close:

Let’s set position and life params at the beginning of completefunc.

Next, we can start looping through each row returned and display them in the format we want. All data returned will be stored in xData.responseXML object.

// ***************************************

completefunc: function (xData, status){

$.jGrowl.defaults.position = “bottom-right”;
$.jGrowl.defaults.life = 10000;

$(xData.responseXML).find(“z\\:row”).each(function() {

// Format your row here…

}); // end – each function

} // end – completefunc

// ***************************************

Here, let’s stop for a minute and think of how to implement a header part of the notification messages saying “Your messages for today” for instance. For that i introduce a flag called firstMessage, which will help us to construct header message by executing the code only once as implemented below. This header has a lifespan of 5 seconds.

Next we start formatting notification messages for each entry in Notifications list. First let’s get notification ID – SPListItem ID – so that we can provide a link to notification. In messageHtml variable, we basically construct the html part for each notification.

Layout is an icon for the notification followed by its title – linked to notification list item – and below its description.

4. Implement “Mark as Read” logic

Almost done for this article! One thing left, which is marking notifications as read upon clicking close button, so that they are not displayed each time page is loaded. This logic is definitely a must. Imagine having SPNotifications for your intranet and assume that notifications are displayed when you visit homepage of your intranet – or any other department landing page. In that case, showing same notifications every time you visit the home page wouldn’t be that nice, as some point it’d get annoying!! Since this is the case, we need to implement a ‘close callback’ logic here to mark notifications as read.

jGrowl has already an option for close callback – as mentioned in section 2 above. So all we have to do is to implement it in a way that notification list item is updated using SPServices UpdateListItems operation.

Here is our MarkAsRead function which only takes notification ID as input parameter. I’m capturing all script structure so you can see where this function sits. Basically it’s right out of document-ready function scope, at the global level of entire javascript.

Now we have the ‘MarkAsRead’ function ready, all we have to do is to add the code snippet to call it. You can include this right below where we constructed the html for notification messages as shown below.

…and we are done!!! it’s time to test it now..

5. Test your first SPNotifications

To test it, drop a CEWP to your homepage and provide the link SPNotifications script in CEWP options. For example, you can upload the script to Shared Documents, just for testing purposes.

In my Notifications list, i created 3 entries having them assigned to myself and their status being ‘Unread’. Visiting my homepage, I see the following.

After 5 seconds, notifications header ‘Your messages for today’ will disappear. Note that in jGrowl options, I set sticky to true.

Now let’s say, I read the ‘Parking Lot Closed’ notification and clicked that little ‘X’ button. This will trigger close callback function and status for that notification will be set to ‘Read’, i.e. that notification will be marked as read. You can check it from Notifications list as shown below.

Now, let’s visit our homepage again and see only 2 unread notifications are left instead of 3 notifications.

That concludes this article – jGrowl Notifications for SharePoint 2010 – Part 2.

Now I have to think a better way to store and populate those notifications from power user or admin perspective.

Thanks for reading. If you have any suggestions, feedback, having trouble to implement; feel free to drop a note.


zieglers

Posted in IT Stuff, SharePoint, SharePoint 2010 | Tagged: , , , , , , , | 2 Comments »

SharePoint Alerts Export Import add-in Part – 3

Posted by zieglers on November 9, 2009

Alerts

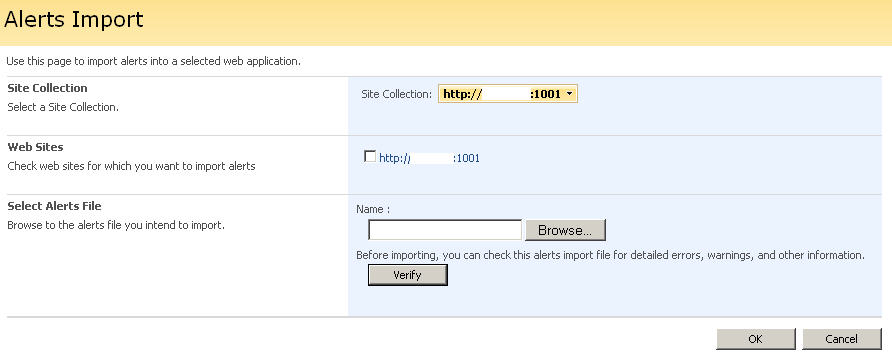
Here is the 3rd part of the article – SharePoint Alerts Export Import add-in. I realized that it’s been a while that i wrote first and second articles. Taking a quick look at those, i see that “importing alerts” logic is left for this article.

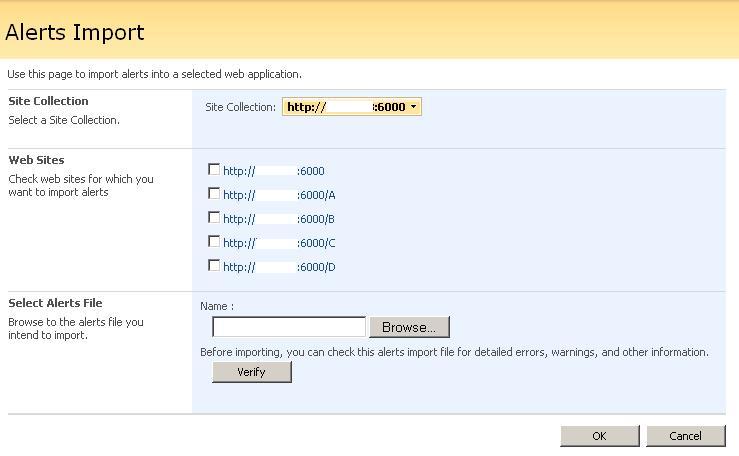
Importing alerts can be done for a selected site collection and also individual subsites can also be selected explicitly. Alerts export logic was exporting all alerts of a site collection, not only root site, but also all subsites. Also those alert details were stored in an xml file in a structured manner. However, for import operation we need a selective import logic. Not all the time we might need to import alerts for a whole site collection. That’s why logic will be a little more complicated than exporting alerts.  

Moreover, an import operation can take some time based on number of alerts being imported and number of subsites exist. That’s why we need to have an SP Long operation so that user knows operation is being executed. Here there is a nice thing to note, that is, if user somehow closes the browser, import operation is not interrupted and goes on in the background until finished.Another important thing is the difference between type of alerts:  sp list alerts and search alerts. Although both of them are using SPAlert class, based on attributes being set a generic list alert can become a search alert. (p_query is the most important attribute for a search alert, basically which holds the query of the search alert)Here is a look how our Alerts Import application page ui is going to be like.   

1

After this intro, it’s time to get started.  Firstly let’s take a look at UI design. 

Alerts Import Page – UI Design

As for site collection selector seen above in first subsection of UI, we’ll use OOTB SharePoint SiteAdministrationSelector control. This control is frequently used in many application pages of Central Admin. Then, in order to list all subsites (in subsection 2) after a site collection is selected, we’ll have a CheckBoxList control. Finally, there is going to be a FileUpload control to select import file – the file which is exported using Alerts Export page. In addition, there is a “Verify” button to validate selected import file.  

SiteAdministrationSelector control 

<!-- *********************************************************
DISPLAY THE SITE COLLECTION SELECTOR USING THE InputFormSecton AND SiteAdministrationSelector CONTROLS. -->
<wssuc:InputFormSection runat="server"
   Title="<%$Resources:spadmin, multipages_sitecollection_title%>"
   Description="<%$Resources:spadmin, multipages_sitecollection_desc%>" >
   <Template_InputFormControls>
      <tr><td>
         <!-- Put your control here-->

<SharePoint:SiteAdministrationSelector id="SiteCollectionSelector" runat="server" OnContextChange="OnContextChange" /></td></tr></Template_InputFormControls> </wssuc:InputFormSection><!-- ********************************************************** -->   

Subsites CheckBoxList 
 
<!-- **********************************************************
DISPLAY ALL SUBSITES USING THE InputFormSecton AND ASP:CheckBoxList CONTROLS -->
<wssuc:InputFormSection runat="server"
   Title="Web Sites"
   Description="Check web sites for which you want to import alerts" >

   <Template_InputFormControls>
   <tr><td>
      <asp:CheckBoxList ID="cbWebs" runat="server" CssClass="ms-listheaderlabel" EnableViewState="true"   />
   </td></tr>        
   </Template_InputFormControls>
</wssuc:InputFormSection>
<!-- *********************************************************** -->

FileUpload control for Alerts Import file and Verify Button
  
<!-- File name section -->
<wssuc:InputFormSection
    Id="SelectFileSection"
    Title="Select Alerts File"
    Description="Browse to the alerts file you intend to import."
    runat="server">
    <Template_InputFormControls>

        <wssuc:InputFormControl runat="server" LabelText="Name :">
         <Template_Control>
         <span dir="ltr"> 
          <asp:FileUpload ID="FileUpload1" runat="server" />
         </span>
         </Template_Control>
        </wssuc:InputFormControl>

        <wssuc:InputFormControl LabelText="Before importing, you can check this alerts import file for detailed errors, warnings, and other information." runat="server">
         <Template_Control>
          <asp:button class="ms-ButtonHeightWidth" runat="server"
           text="Verify"
           OnClick="ButtonVerifyClick"
           id="ButtonVerify">
       </asp:button>
         </Template_Control>
        </wssuc:InputFormControl>

        <wssuc:InputFormControl runat="server">
         <Template_Control>
          <div><asp:Label id="lblFileValidation" runat="server"/></div>
         </Template_Control>
        </wssuc:InputFormControl> 
    </Template_InputFormControls>
</wssuc:InputFormSection>

Alerts Import Page – Import Logic Design

So far, we have our UI elements ready. Now, let’s take a look at application logic. Almost all page logic is executed after user clicks ok button. Here is BtnSubmit_Click logic:

Basic validations

  • Check if at least one web selected or not –> Display validation message if no web selected
  • Check uploaded file –>Restrict the user to upload only .xml file

Preparations

  • Assign import log file name and path
  • Get url, port, virtual path details

Import Operation

  • Read Alerts xml file for import operation
  • Initialize date and alert count
  • Iterate through each row of ‘Alerts’. This is also equivalent to looping through each web object.
    • Only import alerts for selected webs
    • Get alert property values from xml
    • Check Alert Template Type. This determines if an alert is a Search alert, List Alert, Item Alert …etc.
    • Create alerts

Alerts Import Page – Implementation

Basic validations

Before starting to import alerts, first we need to check alerts import file. Here we get some info about file using FileUpload control and only allow .xml files.

// Check uploaded file
if (FileUpload1.HasFile)
{
    // get the full path of your computer
    string strFileNameWithPath = FileUpload1.PostedFile.FileName;
    // get the extension name of the file
    string strExtensionName = System.IO.Path.GetExtension(strFileNameWithPath);
    // get the filename of user file
    string strFileName = System.IO.Path.GetFileName(strFileNameWithPath);
    // get the file size
    int intFileSize = FileUpload1.PostedFile.ContentLength / 1024; // convert into byte

    // Restrict the user to upload only .xml file
    strExtensionName = strExtensionName.ToLower();
    if (strExtensionName.Equals(“.xml”))
    {
        // upload the file on the server
        FileUpload1.PostedFile.SaveAs(AlertsDir + strFileName);

        strMessages += “Uploaded file details <hr />” +
            “File path on your Computer: ” + strFileNameWithPath + “<br />” +
            “File Name: ” + strFileName + “<br />” +
            “File Extension Name: ” + strExtensionName + “<br />” +
            “File Size: ” + intFileSize.ToString();
       
        // Assign Alerts File Path
        alertsFile = AlertsDir + strFileName;
    }
    else
        strMessages += “<br />Only <b>.xml</b> file is allowed, try again!<br />”;
}
else
    strMessages += “<br /><b>Select Alerts File: </b>You must select a valid alerts import file.<br />”;

Preparations

You can choose an import log file naming convention based on your needs. Here I used DateTime stamp.

// Assign import log file name and path

string logfile = logDir + “ImportLog_” + DateTime.Today.Day.ToString() + DateTime.Today.Month + DateTime.Today.Year.ToString() + “.txt”;

Import Operation

  • Read Alerts xml file for import operation

// Read Alerts xml file for import operation
System.Data.DataSet ds = new System.Data.DataSet();

// Read selected alerts import xml file
ds.ReadXml(alertsFile);
ds.Locale = System.Globalization.CultureInfo.CurrentUICulture;

// Read xml document
System.Xml.XmlDocument doc = new System.Xml.XmlDocument();
doc.Load(alertsFile);

// Keep a list of selected webs in an arraylist
ArrayList selectedWebsList = new ArrayList();
foreach (ListItem item in cbWebs.Items)
    if (item.Selected)
        selectedWebsList.Add(item.Text);

  • Initialize date and alert count and check datatable loaded by xml file.

// Initialize date and alert count
long AlertCount = 0;
DateTime start = DateTime.Now;
DateTime finish = DateTime.Now;

// Check if xml file has tables for alerts data
if (ds.Tables.Count < 2)
{
    LogMessageToFile(logDir + “ErrorLog.txt”, “Not a valid Alerts xml file”);
    strMessages += “<br /><font color=red><b>File Error: </b></font>Not a valid Alerts xml file! <br />”;
}

  • Iterate through each row of ‘Alerts’. This is also equivalent to looping through each web object.
    • Only import alerts for selected webs
    • Get alert property values from xml
    • Check Alert Template Type. This determines if an alert is a Search alert, List Alert, Item Alert …etc.
    • Create alerts

In case you are having trouble implementing the solution, here is AlertsImportIntoWebs.aspx page: AlertsImportIntoWebs.aspx

zieglers

Posted in IT Stuff, SharePoint | Tagged: , , , , , | 7 Comments »

SharePoint Alerts Export Import add-in Part – 2

Posted by zieglers on June 5, 2009

In this second part of the article, I’ll mention implementation details of Alerts Export/Import add-in.

Most important decision I took as for implementation was not to use code-behind. Simply I coded everything within .aspx page. Why did I do so? Well, for couple of reasons.

Firstly, this allows faster development by avoiding building VS solution and then deploying the solution. A simple page refresh will force the page recompile. If you are developing just couple of application pages, I’d say don’t waste time by building a solution and deploying it each time code-behind changes. You’ll see coding in .aspx page is much faster. Make sure you know C# syntax well 😉

Secondly, no deployment at all. Since you are directly working on page in 12 hive ADMIN folder, once you save your changes, they are already there and page will be recompiled next time you request the page.

Of course, taking this development approach or not is totally up to you. But if you haven’t tried yet, I’d say give it a try and you’ll see that your C# syntax skills will improve drastically.

Ok, Let’s get started!!!

1. First we need a blank ‘Hello World’ application page.

Since we are developing a blank application page for Central Administration Site, masterpage of our application page must be ‘admin.master‘. Also there are some specific SharePoint controls that will be used, so those must be registered as well.

Now, open up NotePad and create an empty text file and save it as Test.aspx.

a. Adding required assembly and SharePoint control references

Include following snippet to Test.aspx.

<%@ Assembly Name=”Microsoft.SharePoint.ApplicationPages.Administration, Version=12.0.0.0, Culture=neutral, PublicKeyToken=71e9bce111e9429c”%>
<%@ Page Language=”C#” AutoEventWireup=”true” Inherits=”Microsoft.SharePoint.ApplicationPages.GlobalAdminPageBase” MasterPageFile=”~/_admin/admin.master” %>
<%@ Import Namespace=”System.Net” %>
<%@ Import Namespace=”Microsoft.SharePoint” %>
<%@ Import Namespace=”Microsoft.SharePoint.Administration” %>
<%@ Import Namespace=”Microsoft.SharePoint.Utilities” %>
<%@ Import Namespace=”Microsoft.SharePoint.ApplicationPages” %>
<%@ Register Tagprefix=”SharePoint” Namespace=”Microsoft.SharePoint.WebControls” Assembly=”Microsoft.SharePoint, Version=12.0.0.0, Culture=neutral, PublicKeyToken=71e9bce111e9429c” %>
<%@ Register Tagprefix=”Utilities” Namespace=”Microsoft.SharePoint.Utilities” Assembly=”Microsoft.SharePoint, Version=12.0.0.0, Culture=neutral, PublicKeyToken=71e9bce111e9429c” %>
<%@ Register TagPrefix=”wssawc” Namespace=”Microsoft.SharePoint.WebControls” Assembly=”Microsoft.SharePoint, Version=12.0.0.0, Culture=neutral, PublicKeyToken=71e9bce111e9429c”%>
<%@ Register TagPrefix=”wssuc” TagName=”ToolBar” src=”~/_controltemplates/ToolBar.ascx” %>
<%@ Register TagPrefix=”wssuc” TagName=”InputFormSection” src=”~/_controltemplates/InputFormSection.ascx” %>
<%@ Register TagPrefix=”wssuc” TagName=”InputFormControl” src=”~/_controltemplates/InputFormControl.ascx” %>
<%@ Register TagPrefix=”wssuc” TagName=”ButtonSection” src=”~/_controltemplates/ButtonSection.ascx” %> 

b. Adding ContentPlaceHolders

Include PlaceHolderPageTitle and PlaceHolderPageTitleInTitleArea content placeholders. Former determines browser page title, latter determines application page title.

 <asp:Content ID=”PageTitle” runat=”server” ContentPlaceHolderID=”PlaceHolderPageTitle”>
    Test Page Title – AAA
</asp:Content>
<asp:Content ID=”PageTitleInTitleArea” runat=”server” ContentPlaceHolderID=”PlaceHolderPageTitleInTitleArea”>
    Test Page Title – BBB
</asp:Content>

c. Adding Main PlaceHolder

Include PlaceHolderMain content placeholder. This placeholder will hold all controls in the main page area. For our test page we only include an AP.NET Literal control to display HelloWorld message.

<asp:Content ID=”Main” ContentPlaceHolderID=”PlaceHolderMain” runat=”server”>
 <!– Use a ASP.NET Literal Control to display messages –>
 <asp:Literal ID=”litMessages” runat=”server” />
</asp:Content>

d. Adding code for page logic

Now we can start writing code for our test page. Our C# code will be in between script tags of the page. All we need to do is to assign ‘Hello World’ to messages literal control in PageLoad event.

<script runat=”server”>
   
    protected override void OnLoad(EventArgs e)
    {
        //****************************************
        // Validate the page request to avoid
        // any malicious posts
        if (Request.HttpMethod == “POST”)
            SPUtility.ValidateFormDigest();
        //****************************************
        // Validate the page request to avoid
        // any malicious posts
        if (Request.HttpMethod == “POST”)
            SPUtility.ValidateFormDigest();
        //****************************************
        // Initialize the controls on the page
        // if its not a PostBack request
        if (!(Page.IsPostBack))
        {
            litMessages.Text = “Hello World!”;
        } // end – IsPostPack
    }
   
</script>

e. Copy Test.aspx to /12/ADMIN/ folder.

That’s all for our Test application page. No deployment, no building solution.. All we need to do is to copy Test.aspx to ~/12/ADMIN/ folder. Now open your browser. Go to Central Admin site, and test your Test.aspx. (http://yourservername:centraladminportnumber/_admin/Test.aspx)

You can download Test.aspx application page here: TestASPXCode

2. Adding UI controls – SharePoint Web Application Selector

Now we have a blank application page, we can start adding UI elements one by one. It’s always a good practice to keep logically related controls in a panel. Since providing a web application is the only input for export alerts operation, we’ll have only SharePoint Web Application selector control and submit buttons on ExportAlerts page, and will keep those in an input panel as follows.

Add the following snippet in PlaceHolderMain below litMessages literal control.

<!– Use a ASP.NET Panel Control to show or hide the form from code –>
 <asp:Panel ID=”inputForm” runat=”server”>
     <table border=”0″ cellspacing=”0″ cellpadding=”0″ width=”100%”>
        <tr>
          <td>  
         
             <!– *********************************************************
                 DISPLAY THE WEB APPLICATION SELECTOR
                 USING THE InputFormSecton AND WebApplicationSelector CONTROLS.
                 
                 THE TITLE AND DESCRIPTION ARE SPECIFIED IN THE CORRESPONDING
                 ATTRIBUTES OF THE InputFormSection CONTROL, WHILE THE CONTROLS
                 THEMSELVES ARE PLACED INSIDE THE InputFormControl SECTION –>
            <wssuc:InputFormSection runat=”server”
          Title=”Web Application”
          Description=”Select a Web Application” >
                <Template_InputFormControls>
                <tr>
              <td>
                    <SharePoint:WebApplicationSelector id=”Selector” runat=”server”
                      TypeLabelCssClass=”ms-listheaderlabel”
                      AllowAdministrationWebApplication=”true” />
                    </td>
          </tr>
                </Template_InputFormControls>
         </wssuc:InputFormSection>        
            <!– ********************************************************** –>
           
         <!– ****************************
              OK AND CANCEL BUTTON SECTION –>
         <wssuc:ButtonSection runat=”server” TopButtons=”false” BottomSpacing=”5″ ShowSectionLine=”true”>
          <Template_Buttons>
           <asp:Button UseSubmitBehavior=”false” runat=”server” OnClick=”BtnSubmit_Click” Text=”<%$Resources:wss,multipages_okbutton_text%>” id=”BtnSubmitBottom” accesskey=”<%$Resources:wss,okbutton_accesskey%>” Enabled=”true”/>
          </Template_Buttons>
         </wssuc:ButtonSection>
         <!– **************************** –>
        
       </td>
     </tr>
        </table>
    </asp:Panel>

One thing to note here is that we need to provide code for ButtonClick event. So add the following to script section of the page.

    //*************************************************************
    // This method is called when the user clicks the “OK” button
    // to activate the site feature package.
    protected void BtnSubmit_Click(object sender, EventArgs e)
    {
        // Your code here
    }

 So far so good! If you have done everything w/o any mistakes your page should look as follows.

 Alerts-4

3. Adding ‘Export Alerts’ logic.

We have our application page. We have our UI elements (web application selector and submit buttons). Now it’s time to get our hands dirty! All ‘Export Alerts’ logic will be implemented in BtnSubmit_Click event.

 Ok, at this point let’s take a look at our design details once again:

A. Crawl whole web application, which means loop through all site collections and all webs underneath.

foreach –> Site Collection in WebApplication

   foreach –> Web object in Site Collection

      foreach –> alert in Alert Collection of web

               Export alert details to xml file.

B. Xml helper functions. We need helper functions to get alert property details and write them in Alerts Export xml file in a structured way. Those functions are:

CreateXmlDocument, AddChildElement, StringValueOfObject, StringValueOfAlerts

I’m not going to mention details about those helper functions since they are out of our scope. I also didn’t spend time on them to reflect a better coding practice. As a result they are very straight-forward and represent a trivial functional coding. Be my guest if you want to refactor them and make them look better 🙂

C. Output messages

I haven’t provided logging functionality for export alerts, since exported xml file sort of acts as log itself. Only we need to display some statistics to UI such as number of exported alerts, urls of crawled site collections and webs, execution time, … etc. For this purpose we’ll have only one string variable, namely strMessages. We’ll append any sort of execution messages to this string and then eventually assign it to litMessages.

Here is the BtnSubmit_Click code:

    //*************************************************************
    // This method is called when the user clicks the “OK” button
    // to export alerts of a selected web application.
    protected void BtnSubmit_Click(object sender, EventArgs e)
    {
        //Prepare a string object to display the result
        //of the export alerts operation for each site
        string strMessages = “”;
        // Hide input panel
        inputForm.Visible = false;
       
        try
        {
            // Execution ‘start’ and ‘finish’ time variables
            DateTime start = DateTime.Now;
            DateTime finish = DateTime.Now;
            // Construct Exported Alerts Xml file name
            // Format: ddmmyyyy_hhmmss.xml
            alertsFileName = DateTime.Today.Day.ToString() +
                                    DateTime.Today.Month + DateTime.Today.Year.ToString() +
                                    “_” +
                                    DateTime.Now.Hour.ToString() +
                                    DateTime.Now.Minute.ToString() +
                                    DateTime.Now.Second.ToString() +
                                    “.xml”;
               
            // add all the alert info to an XML document
            System.Xml.XmlDocument Document = CreateXmlDocument();
            //Iterate through each of the site collections
            //in the selected web applications
            foreach (SPSite site in Selector.CurrentItem.Sites)
            {
                //Disable the CatchAccessDeniedException
                //of the site collection to avoid being redirected
                //to the “Access Denied” page if access is denied.
                site.CatchAccessDeniedException = false;
                // Display site url
                strMessages += “<br /><b> === Exporting Alerts for site: ” + site.Url + ” === </b><br />”;
                //Iterate through each site in the site collection
                foreach (SPWeb web in site.AllWebs)
                {
                    // Get all users of the web
                    SPUserCollection collUsers = web.SiteUsers;
                    // Check if there are any alerts to be exported for this web object
                    if (web.Alerts.Count > 0)
                    {
                        // create the alerts root node
                        System.Xml.XmlElement AlertsNode = AddChildElement(Document.DocumentElement, “Alerts”);
                        // Add Web Url attribute
                        System.Xml.XmlAttribute NewAttribute = AlertsNode.OwnerDocument.CreateAttribute(“WebUrl”);
                        AlertsNode.Attributes.Append(NewAttribute);
                        NewAttribute.InnerText = Convert.ToString(web.Url);
                        // Add IsRootWeb attribute
                        NewAttribute = AlertsNode.OwnerDocument.CreateAttribute(“IsRootWeb”);
                        AlertsNode.Attributes.Append(NewAttribute);
                        // Display web object info
                        strMessages += “<br /> + Web : ” + web.Url + ” + <br />”;
                        // Save Alerts to xml
                        // iterate through all the alerts for every user of a site
                        foreach (SPUser oUser in collUsers)
                        {
                            SPAlertCollection collAlerts = oUser.Alerts;
                            if (oUser.Alerts.Count > 0)
                            {
                                // Check if this web is a root web or not
                                if (site.Url == web.Url)
                                    NewAttribute.InnerText = “true”;
                                else
                                    NewAttribute.InnerText = “false”;
                                foreach (SPAlert oAlert in collAlerts)
                                {
                                    // Get alert properties
                                    StringValueOfAlerts(AlertsNode, oAlert);
                                    AlertCount++;
                                } // end – foreach SPAlert
                            } // end -if
                        } // end – foreach SPUser
                       
                    } // end – if AlertsCount
                } // end – foreach SPWeb
                port = site.Port;
                AlertsFile = AlertsDir + port.ToString() + “_” + alertsFileName;
                //Allow the site collection to continue handling
                //access denied exceptions
                site.CatchAccessDeniedException = true;
               
            } // end – foreach SPSite
            // Save Alerts Export file
            Document.Save(AlertsFile);
            strMessages += “<br /> ————————————————————————————– <br />”;
            strMessages += “<br /><b>” + AlertCount.ToString() + “</b> alerts <b><font color=green>successfully</font></b> exported for web application: <b>” + Selector.CurrentName + “</b><br />”;
            strMessages += “<br />Export file: <b>” + port.ToString() + “_” + alertsFileName + “</b><br />”;
            finish = DateTime.Now;
            TimeSpan elapsedTime = finish.Subtract(start);
            strMessages += “<br /> Exported in <b>” + elapsedTime.Minutes.ToString() + “</b> minute(s) and <b>” + elapsedTime.Seconds.ToString() + “</b> seconds and <b>” + elapsedTime.Milliseconds.ToString() + “</b> miliseconds <br />”;
           
        }
        catch (Exception AlertsSaveException)
        {
            //if an error occurs during export alerts operation;
            //capture the message to display it to the user
            //after iterating through all the sites
            strMessages += “<br />Alerts Save Error: ” + AlertsSaveException.Message + “<br />”;
        }
        // Display messages if there are any
        litMessages.Text = strMessages;
       
    }

If you are not interested in details of ‘Export Alerts‘ and just want to use it as soon as possible, you can download “AlertsSave.aspx” from this link: AlertsSaveASPX

(Copy and paste word doc contents in a text file and rename it to AlertsSave.aspx. Then copy it to ~/12/ADMIN/ folder.)

Please let me know if you run into any difficulties while trying to implement/run ‘export alerts’ functionality..

zieglers

Posted in IT Stuff, SharePoint | Tagged: , , , , , , , , | Leave a Comment »

SharePoint Alerts Export Import add-in Part – 1

Posted by zieglers on June 5, 2009

This article explains how you can develop a SharePoint Alerts Export/Import add-in for Central Administration site.

First part of the article ‘Alerst Export/Import add-in for SharePoint Part-1‘, will state the problem leading to this solution. Also, some design points will be mentioned.

Background: One of my clients had to delete subsites when a new version of a site template was developed and recreate the site using the new template. In this case, since the alerts are user/web centric when the site was deleted, they were gone. So, I needed a solution to export alerts before deletion and save them on file system. This was the first part of the scenario. Once the new site is created using the new template, it was time to import them back.

Export operation would be at web application scope. On the other hand import operation would give the flexibility of choosing subsites. Also, import file would need to be chosen among multiple exported files at different times. This would also require an upload functionality while importing. As with all upload operations, validation and extension checks were important.

Another requirement was scalability of the solution. It was expected to work for 100 000 alerts and 1000 different users. This was an optimization problem and every extra loop in the logic would cost extra.. Idea seemed simple: first export them, then selectively import. But as I went further in the implementation, I faced some challenges, unexpected object model behaviours … etc. Here i’ll try to mention everything in detail.

Design:

Solution will include two simple custom built application pages for SharePoint Central Administration Site. 

These pages will be reachable thru links in a sub-section called ‘Alerts’ in Application Management section.

Alerts-1

First application page, Export Alerts, is for exporting alerts of a selected web application. (Note that, scope here is ‘Web Application’. This means that all site collections and webs will be looped and alerts will be exported in a way that we keep hierarchy for later to be able to import selectively, namely by selecting a site collection and any web sites in it.)

Alerts-2

Second application page, Import Alerts into a Site Collection, will have three input sections. Firstly user will select a site collection. Secondly sites, alerts will be imported into, will be selected. Then, exported alerts file will be uploaded using an upload control.

At this point, necessary validations will be performed such as file extension check, file format check, file size check … etc. Once all validations are passed successfully, alerts will be imported to selected web sites.

Since import operation can be time consuming based on the number of alets being imported, SPLongOperation will be used to display on-going progress. Moreover, all errors and import operations will be logged for further investigation in case needed.

Also, for better exception handling error messages will be refactored.

Alerts-3

Implementation details are explained in Part-2 of  ‘SharePoint Alerts Export Import add-in’ article.

Stay tuned.. 🙂

zieglers

Posted in IT Stuff, SharePoint | Tagged: , , , , , , | 7 Comments »